
Direct Answer
Build your first base after you have the Habitat Builder. The goal is a powered room with a full Fabricator — this removes the Lifepod’s crafting restrictions and unlocks the complete recipe list including the Processor, advanced materials, and vehicle parts. A single corridor with a hatch, one Solar Panel, a Fabricator, and a few Wall Lockers is all you need to start.
This guide covers when you are ready to build, where to place your first base, what to build first, how power works, and what mistakes to avoid.
Before You Build
Your first base depends on the Habitat Builder. If you do not have it yet, follow the Scanner to Habitat Builder guide first.
Prerequisites Checklist
- Habitat Builder crafted and in your inventory
- At least 10 Titanium (for the basic structures)
- At least 4 Quartz (Hatch + Solar Panel + Fabricator)
- At least 1 Copper (for the Fabricator)
- An area within oxygen range of the Lifepod
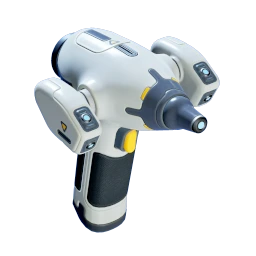
What the Habitat Builder Does
Equip the Habitat Builder and right-click (PC) to open the build menu. The menu is organized into categories:
| Category | What You Can Build |
|---|---|
| Basic Compartments | Foundation, Corridor, Room, Hatch, Ladder |
| Exterior Modules | Solar Panel, structural reinforcements |
| Interior Facilities | Fabricator, Wall Locker, other equipment |
You need to be near the build location and have the required materials in your inventory. The Habitat Builder consumes materials directly from your inventory as you place each structure.
Choosing a Location
Your first base does not need to be in a perfect spot — you can always build a second base later. What matters for the first base:
Close to resources: Build near Titanium nodes, orange Coral Domes (Quartz), and cave entrances (Copper) within swimming distance of the Lifepod. This minimizes travel time when gathering materials.
Shallow enough for Solar Panels: Solar Panels work best near the surface. Building deeper than the shallows reduces their power output.
Near an ocean current (optional but useful): Light-blue water chutes called ocean currents can be used with Hydroelectric Turbines for 24-hour power later. Building near one now means easier upgrading later.
What to avoid:
- Building right next to the Lifepod — the Lifepod already serves as a temporary base; spread out to access new areas.
- Building deep without an alternate power plan — Solar Panels lose effectiveness at depth.
Recommended Build Order
This sequence gets you a powered, functional base with minimal material waste:
| Step | Structure | Materials | Purpose |
|---|---|---|---|
| 1 | Foundation | 2 Titanium | Flat building platform, improves hull integrity |
| 2 | Corridor or Room | 2–5 Titanium | Your first habitable space |
| 3 | Hatch | 1 Titanium + 1 Quartz | Exterior entrance — required to get inside |
| 4 | Solar Panel (on top) | 1 Titanium + 2 Quartz | Daytime power for life support and equipment |
| 5 | Fabricator (inside) | 1 Titanium + 1 Copper + 1 Quartz | Full crafting station — removes Lifepod restrictions |
| 6 | Wall Lockers (inside) | 2 Titanium each | Storage for materials and tools |
Step-by-Step
Step 1: Foundation — Find a relatively flat area. Open the Habitat Builder menu, select Foundation, and place it on the seafloor. The Foundation provides a stable platform and increases hull integrity, which matters more as you expand.
Step 2: Corridor or Room — Place a Corridor (2 Titanium) or Room (5 Titanium) on the Foundation. A Corridor costs less and works for early storage plus a Fabricator. A Room gives more interior space but costs more Titanium. Start with a Corridor if Titanium is tight.
Step 3: Hatch — Build a Hatch on an exterior wall of your Corridor or Room. Without a Hatch, you cannot enter the base. Swim up to the Hatch and interact with it to open.
Step 4: Solar Panel — Mount a Solar Panel on the top or side of your base where it is exposed to light. One panel covers daytime operation. The panel generates power while the sun is up; your base’s life support and the Fabricator will function during this time.
Step 5: Fabricator — Enter your base and place the Fabricator on an interior wall using the Habitat Builder’s Interior Facilities menu. The Fabricator only works in a powered base, so make sure the Solar Panel is installed first.
Step 6: Wall Lockers — Place Wall Lockers on interior walls for material storage. They mount on walls and do not take up floor space, making them efficient for a small first base.
Material Savings Tip
You can skip the Foundation and build directly on the seafloor to save 2 Titanium. The Foundation improves hull integrity for later expansion but is not required for a minimal first base.
What Changes After You Build
Once your base has a powered Fabricator, several things unlock:
- Full recipe list: The “Requires Fully Functional Fabricator” warning on the Lifepod Fabricator is gone. All unlocked recipes become craftable.
- Processor: Craft this station inside your base to make Titanium Ingots (3 Titanium → 1 Ingot), Copper Ingots, Strong Acid, and Biofuels. The Processor is a gate to vehicle and advanced tool progression.
- Scanner Station: Track nearby resource nodes from inside your base.
- Biobed: Increases inventory slot count permanently.
These are your next priority builds after the first base is operational.
Power Management
Solar Panel Basics
| Aspect | Detail |
|---|---|
| Recipe | 1 Titanium + 2 Quartz |
| Placement | Top or side of base, exposed to light |
| Daytime output | Covers life support + Fabricator (1 panel) |
| Night output | Weaker — equipment may run slowly or stop |
| Depth | Less effective at depth |
Managing Night Power
A single Solar Panel keeps life support and a Fabricator running during the day. At night, power generation drops significantly. You have a few options:
- Build a second Solar Panel — the simplest fix. Two panels provide more reserve power through the night.
- Limit night crafting — avoid running power-heavy stations (Processor, Scanner Station) at night. Craft during the day and use night time for exploration or inventory management.
- Plan for Hydroelectric Turbines — if you built near an ocean current, a Hydroelectric Turbine placed in the current provides steady power day and night. This is an upgrade for later, not a first-base requirement.
Why Power Matters
Power runs your base’s life support and any equipment you install. Without power, the Fabricator and other stations stop working.
Common Mistakes
- Building too far from resources — Walking (swimming) back and forth for Titanium and Quartz gets old fast. Keep the first base within easy reach of the Lifepod-area resource nodes.
- Building too deep — Solar Panels need surface proximity. If you build at depth, expect weak or no solar power. You would need an alternate power source before you may be ready for one.
- Forgetting the Hatch — A sealed room with no entrance means you have to deconstruct it. Always place a Hatch before sealing the room.
- Placing the Fabricator without power — The Fabricator installs fine but does not work until the base has power. Build the Solar Panel first.
- Overbuilding the first base — A single Corridor works for early storage plus a Fabricator. Save Titanium for the Processor and other progression items instead of building a large base immediately.
- Not bringing enough materials — Before leaving to build, check the Habitat Builder recipe costs. Minimum: 10 Titanium, 4 Quartz, 1 Copper. Going back for one missing piece is frustrating.
Next Steps
Once your first base is powered and has a Fabricator:
- Craft a Processor — needed for Titanium Ingots, Copper Ingots, Strong Acid, and Biofuels. This unlocks vehicle and advanced tool progression.
- Build a Scanner Station — tracks nearby resource types from your base.
- Find Silver in Lifepod-area caves — needed for the Standard Air Tank and Wiring Kits.
- Explore Base Storage Modules — scan fragments to unlock larger storage options.
- Follow NOA missions from your Lifepod — they guide you to new areas, scans, and Adaptations.
For a broader early-game overview including food, water, and air management, see the Beginner Guide.